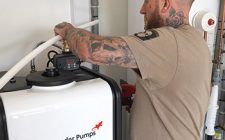
Installing a water softener

STEP 1
• Carry out a pressure test - your minimum dynamic pressure must exceed 1.5 bar.
• If the daytime water pressure exceeds 3.5 bar then fit a 5 bar pressure limiter.
• Check there is only one rising main and that the unit is as close as possible to the incoming water supply, a power point, and has access to a drain for the regeneration.
• Whenever possible, install the softener near to an outside wall to facilitate the overflow hose.
• Ensure the overflow hose does not terminate over a gully as any foul smell from the gully will come back up the hose into the salt compartment.

STEP 2
• Connect the hoses to the rear of the water softener.
• Looking at the rear of the softener, the inlet is on the left and the outlet is on the right.
• Both the inlet and outlet threaded connections can be removed by unclipping the retaining clips to facilitate an easy hose connection.
• Always remember to reinsert the clips again.
• Having fitted the Rapid-Fit bypass to the pipework, connect the other end of the hoses to the bypass and tighten to seal.

STEP 3
• Connect the drain hose to the barbed elbow on top of the control valve, under the rear top cover.
• Cut to length and fix it with the jubilee clip and run the drain hose to either an outside drain or an upstand and allow a 20mm air gap at the end of the hose. Alternatively use a tundish.
• Ensure the drain hose has no kinks in it.
• The white flexible drain hose can run uphill internally for a maximum of 1 metre if you have an incoming water pressure over 3 bar.

STEP 4
• Connect the remainder of the white drain hose to the half inch overflow spigot on the rear of the cabinet.
• The overflow hose must run downhill and ideally exit through an outside wall.
• A 22mm copper protective sleeve through the outside wall will prevent kinks and restrictions on the hose for the overflow.
• Ensure the softener drain hose and the overflow hose do not share a common drain pipe.

STEP 5
• Place the Rapid-Fit bypass into the bypass position by pushing the plunger on the blue side.
• Open the mains stopcock slowly to flush the new pipework by turning on a mains soft cold tap.
• Check all the connections for leaks.
• If everything is tightly sealed, you can connect the unit to a continuous electrical supply. Make sure to do this with the power off.

STEP 6
• Turn on the power and set up the time of day.
• Follow the instructions on the supplied test kit to determine the hardness of the water.
• Place the Rapid-Fit Bypass in the Service position by pushing the plunger on the red side.
• Check for any leaks.

STEP 7
• Run a mains soft tap for five minutes to get rid of any air and resin dust.
• Fill the softener with tablet salt, making sure you don’t fill the salt compartment higher than the bottom edge of the lift handles on the sides of the softener cabinet.
• Salt levels should be checked weekly.
• Add 1 litre of water to the salt compartment – you will need to do this on the initial installation only.
• The Monarch Water Softener is now ready to use.

You might also like

The role of heat interface units (HIUs) in modern heat networks
How to install press-fit pipework for ACR systems